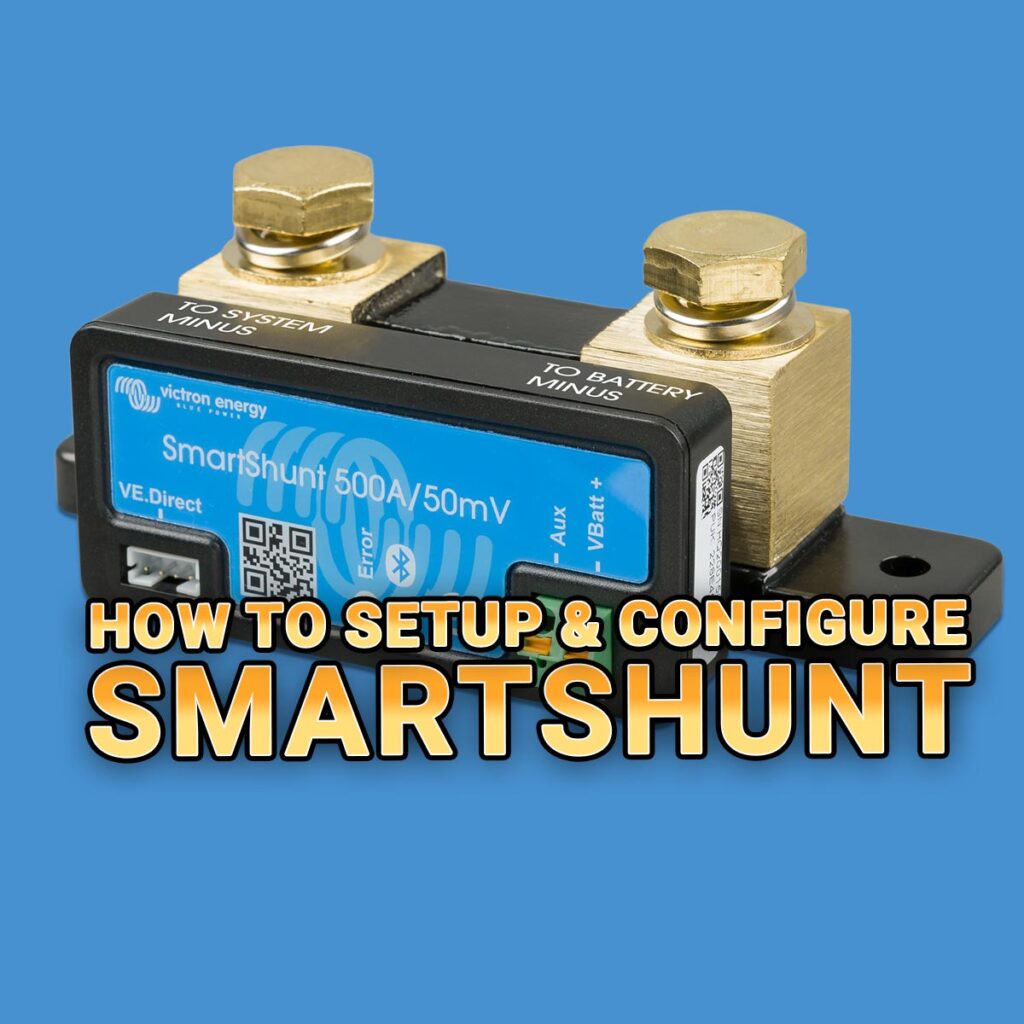
How to Install the Victron SmartShunt


Now that you know what the Victron Smartshunt does, let’s now take a look at how to Install the Victron SmartShunt.
In the following sections, you’ll find a thorough breakdown of each component that comes with your Victron SmartShunt ($95.95) package, as well as a meticulous guide on how to mount and wire the device. I’ll delve into the specifics of each terminal type, ensuring you understand their unique functions and how they integrate into your electrical system.
I’ll then also explore the SmartShunt’s auxiliary port, a versatile feature that allows for additional monitoring capabilities. Whether you’re interested in keeping tabs on a second battery, monitoring the midpoint deviation of a battery bank, or even tracking temperature changes, we’ll show you how to set it up.
Moreover, for those who are integrating the SmartShunt into a system with a GX device such as the Victron Cerbo GX (Price not available) or Victron Ekrano GX ($563.55), I’ll cover how to establish this connection for enhanced monitoring and control. By the end of this guide, you’ll not only have your SmartShunt installed but also be well-versed in how to utilize its full range of features for optimal performance.
What’s in the box?
When you purchase a SmartShunt, you’re not just getting the advanced battery monitor itself; you’re also receiving essential accessories that make installation and operation seamless. Here’s what you can expect to find in the SmartShunt box:
SmartShunt Unit
Naturally the Victron SmartShunt ($95.95) is the main component that comes in the box.
Two 1.5m (59″) Red Cables with Fuse
To ensure a secure and safe connection, the SmartShunt box includes two 1.5-meter (approximately 59 inches) red cables, each equipped with a fuse.
These cables are designed to connect the SmartShunt to your battery and other components in your system.
The inclusion of fuses in the cables adds an extra layer of safety, protecting your equipment from potential overcurrent situations.
Together, these items provide you with the essential components needed for setting up your SmartShunt system.
Mounting the SmartShunt
The SmartShunt carries an IP21 rating, indicating that it is not waterproof and must be installed in a location that remains dry.
The base of the SmartShunt features two 5.5 mm holes specifically designed for mounting.
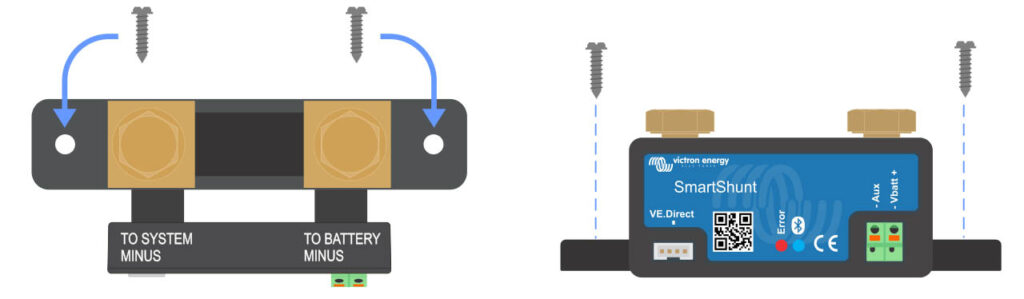
These holes can be utilized to either screw or bolt the SmartShunt onto a solid surface (note that screws are not provided).
The distance between the mounting holes is as follows:
- SmartShunt 500a ($95.95): Two holes 101.5mm apart
- SmartShunt 1000a ($165.75): Two holes 148.8mm apart
- SmartShunt 2000a ($226.10): 148.8mm apart as well as 23mm between each hole on each side, totaling 4 holes.
Connection Points of the SmartShunt
When setting up your SmartShunt system, it’s crucial to understand the different terminal types that are part of the device. Each terminal serves a specific function and is designed for a particular type of connection.
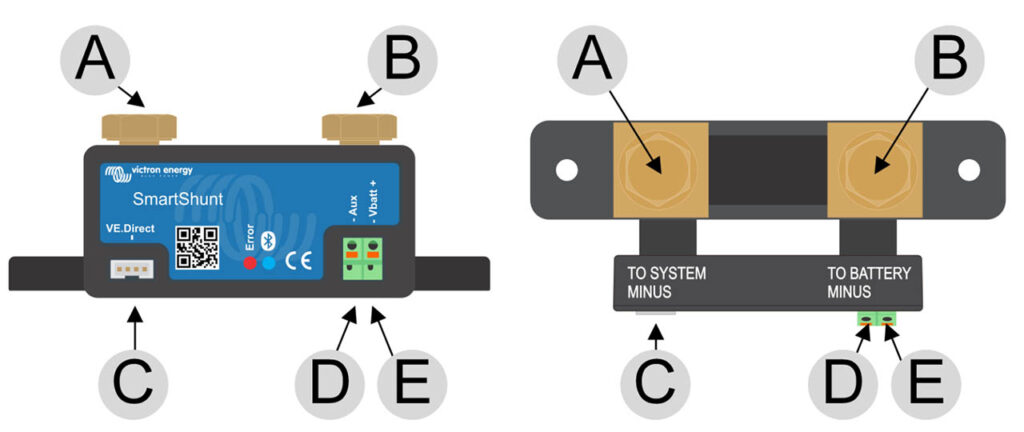
Here’s a breakdown of the SmartShunt connection terminal types:
A: LOAD MINUS (M10 bolt)
This terminal is designed for connecting the load to the SmartShunt. It features an M10 bolt, making it compatible with standard-sized connectors and ensuring a secure connection for the load.
B: BATTERY MINUS (M10 bolt)
Similar to the LOAD MINUS terminal, the BATTERY MINUS terminal also features an M10 bolt. This terminal is specifically for connecting the SmartShunt to the negative terminal of your battery.
C: VE.Direct (VE.Direct terminal)
The VE.Direct terminal is used for connecting the SmartShunt to a Victron Cerbo GX (Price not available) device or other Victron products that support VE.Direct communication. This is done using a VE.Direct Cable ($13.60) connected to your router or network switch, or VE.Direct to USB Interface ($28.05) to connect straight to any computer using a USB port.
This terminal allows for advanced monitoring and control capabilities.
D: Aux (M10 ring terminal)
The Aux terminal features an M10 ring terminal and can be used for various auxiliary functions, such as monitoring a second battery, midpoint monitoring, or connecting a temperature sensor.
E: Vbatt+ (M10 ring terminal)
The Vbatt+ terminal, also featuring an M10 ring terminal, is designed for connecting to the positive terminal of your battery. This terminal is crucial for accurate voltage measurement and monitoring.
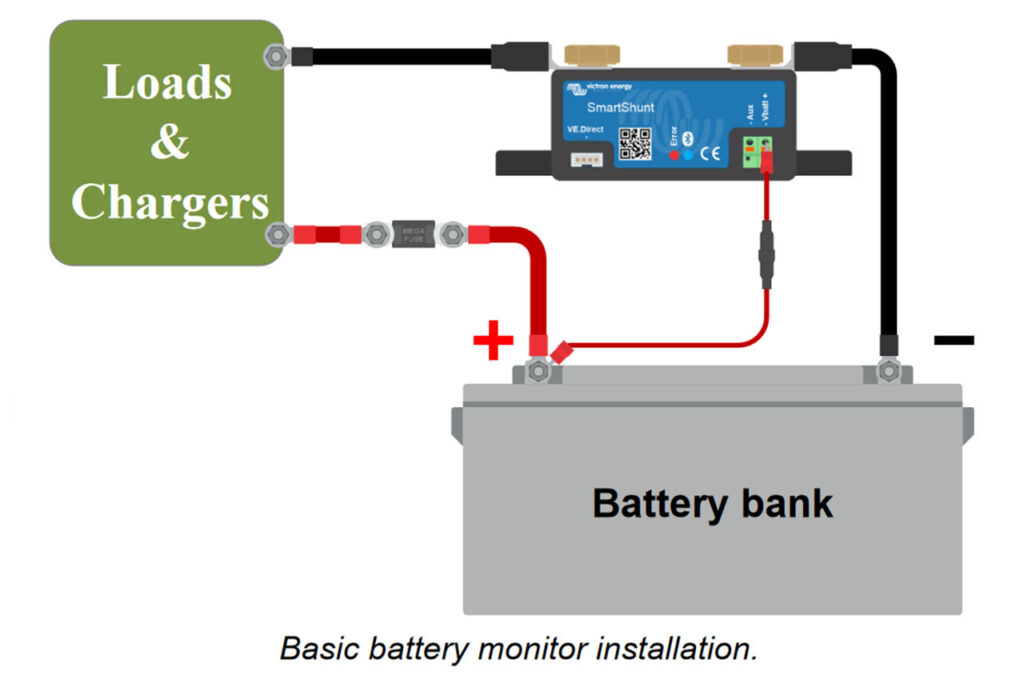
Wiring up the Shunt
Let’s now take a look at how to wire up the Victron SmartShunt to your system using these connection points:
- Attach the negative terminal of the battery to the M10 bolt located on the
BATTERY MINUSside of the shunt.- Secure the shunt bolt with a maximum torque force of 21Nm.
- Ensure that there are no washers or other metal parts between the cable’s lug and the battery’s negative terminal for the best contact.
- It’s important to note that no other connections should be made between the negative terminal of the shunt and the negative terminal of the battery. Any loads or chargers connected at this point will not be included in the calculation of the battery’s state of charge.
- Link the negative terminal of the electrical system to the M10 bolt on the
SYSTEM MINUSside of the shunt.- In most cases this will be the Negative pole of your Inverter.
- Fasten the shunt bolt with a maximum torque of 21Nm.
- Ensure that the negatives of all DC loads, inverters, battery chargers, solar chargers, and other sources of charge are connected after the shunt.
- Note: that until the year 2020, the
SYSTEM MINUSconnection was labeled asLOAD MINUS, in case you have an older model.
- Insert the ferrule pin of the red cable that comes with a fuse into the
Vbatt +terminal on the shunt. - Attach the M10 eye terminal of the red power cable with a fuse, to the positive terminal of the battery. This should be above the main battery cable lug if you have another cable in place, such as when connecting batteries in parallel.
Upon completing these steps, the battery monitor will be powered on. The Bluetooth LED will begin to flash, indicating that Bluetooth is now active.
For the battery monitor to operate fully, it needs to be configured; please refer to Chapter 9 (Configuration) for more details.
If you intend to use the battery monitor for tracking a secondary battery, the midpoint of a battery bank, or the temperature of a battery, consult one of the following three paragraphs for instructions, and then proceed to Chapter 9 (Configuration).
Auxiliary Electrical Connections
The Victron SmartShunt ($95.95) is not just limited to monitoring your main battery bank; it also offers the flexibility to monitor a second parameter.
This additional monitoring capability can be incredibly useful for a more comprehensive understanding of your electrical system. The second parameter can be one of the following:
- Voltage of a Second Battery: If you have a dual-battery system, such as a main battery and a starter battery, the SmartShunt allows you to monitor the voltage of the second battery. This is particularly useful for ensuring that your starter battery is in good health and ready to start your engine when needed.
- Midpoint Deviation of the Battery Bank: For those using a battery bank consisting of multiple batteries, the SmartShunt can monitor the midpoint deviation. This helps in identifying imbalances within the battery bank, which can be crucial for long-term battery health and efficiency.
- Battery Temperature: Temperature can significantly affect battery performance and lifespan. The SmartShunt can monitor the battery’s temperature, providing valuable data that can be used for preventive maintenance.
Wiring the Aux Terminal
To take advantage of these additional monitoring features, you’ll need to wire the Aux terminal appropriately. The Aux terminal features an M10 ring terminal, making it compatible with standard-sized connectors.
Depending on what you choose to monitor—be it the voltage of a second battery, midpoint deviation, or battery temperature, you’ll connect the corresponding sensor or cable to this Aux terminal.
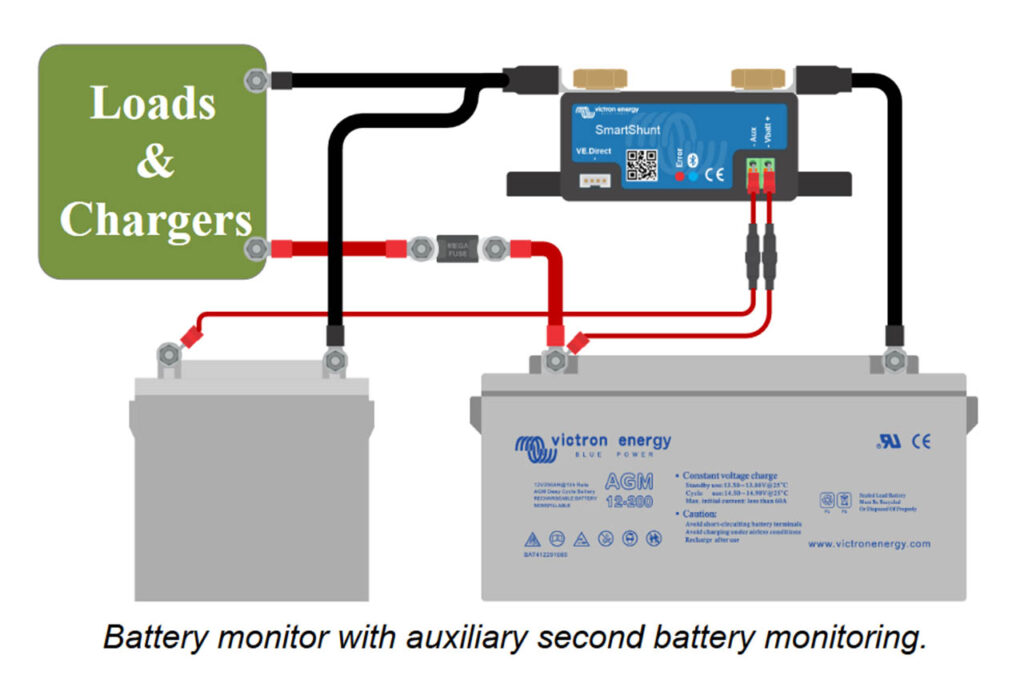
Auxiliary connection for monitoring the voltage of a second battery
If you’re looking to monitor the voltage of a second battery (be it a starter or auxiliary battery), the Victron SmartShunt ($95.95) provides a straightforward way to do so.
Here is the step-by-step connection procedure:
- System Minus Connection: First, ensure that the negative pole of the second battery is connected to the SYSTEM MINUS side of the shunt. This establishes a common ground for the system.
- Connecting to the Aux Terminal: Take the ferrule pin of the second red cable that comes with a fuse. Push this pin into the
Auxterminal on the SmartShunt. This terminal features an M10 ring terminal, ensuring a secure connection. - Connecting to the Second Battery: Finally, connect the M10 lug of the second red cable (which also has a fuse) to the positive terminal of the second battery. This completes the circuit and allows for the monitoring of the second battery’s voltage.
Auxiliary Connection for Midpoint Battery Bank Monitoring
If you have a battery bank consisting of multiple batteries wired in series or series/parallel to create a 24V or 48V system, the SmartShunt allows for midpoint battery bank monitoring. This feature helps in identifying imbalances within the battery bank, which is crucial for long-term battery health and efficiency.
Here is the step-by-step connection procedure:
- Connecting to the Aux Terminal: Take the ferrule pin of the second red cable that comes with a fuse. Push this pin into the
Auxterminal on the SmartShunt. TheAuxterminal features an M10 ring terminal, ensuring a secure connection. - Connecting to the Midpoint: Next, connect the M10 lug of the second red cable (which also has a fuse) to the positive terminal of the midpoint in your battery bank. This will enable the SmartShunt to monitor the midpoint voltage.
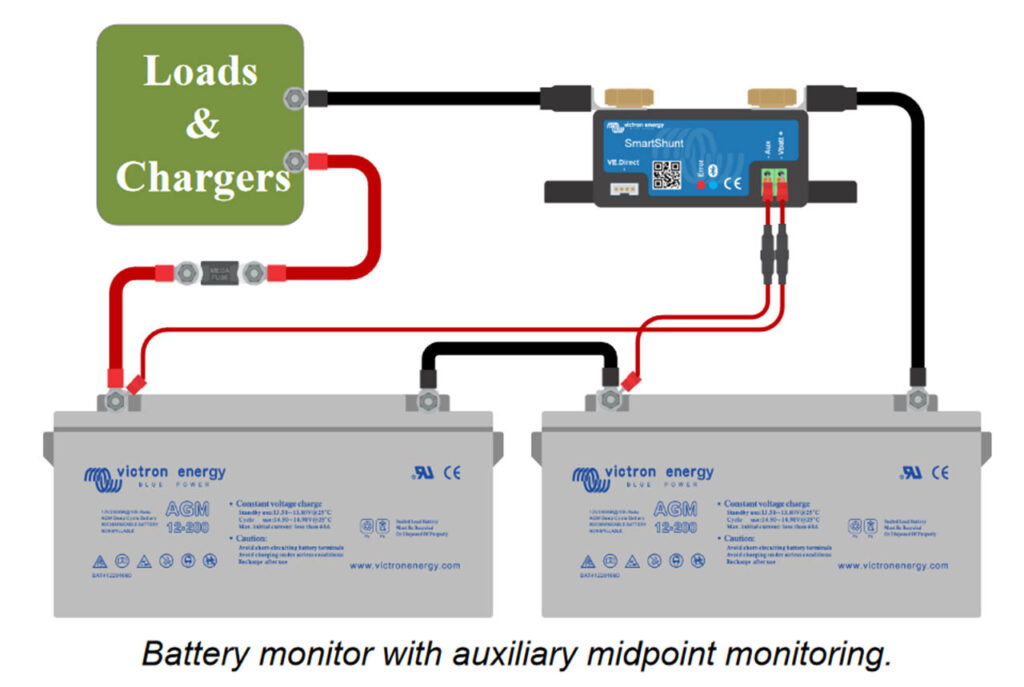
For those interested in a more in-depth understanding of midpoint monitoring, additional diagrams and details can be found in the Midpoint Voltage Monitoring chapter.
By following these steps, you can set up your Victron SmartShunt ($95.95) to effectively monitor the midpoint of your battery bank. This is particularly useful for larger systems where imbalances can significantly impact performance and battery lifespan.
Auxiliary Connection for Temperature Monitoring
If you’re interested in monitoring the temperature of your battery, the SmartShunt offers this capability through the use of an external temperature sensor.

Note that this sensor, compatible with the BMV-712 Smart and BMV-702 Temperature Sensor ($31.45), needs to be purchased separately. It’s important to be aware that this is a different temperature sensor than the Temperature Sensor for Quattro, MultiPlus and GX Devices ($20.40) included with Victron inverter/chargers and some battery chargers.
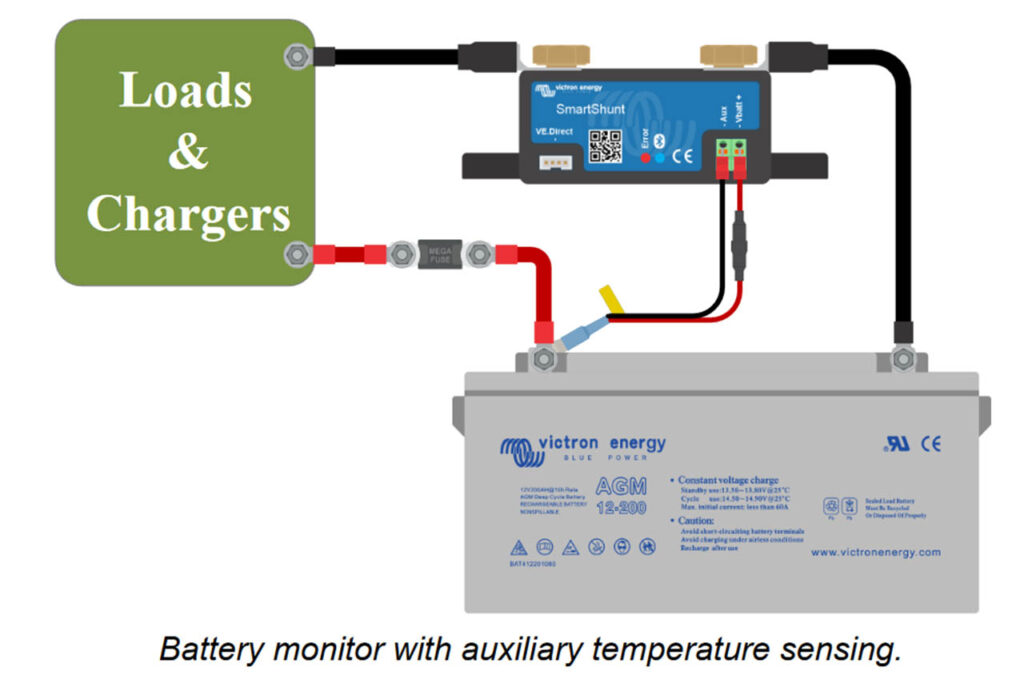
Here is the step-by-step connection procedure:
- Connecting to the Aux Terminal: Take the ferrule pin of the black temperature sensor wire and push it into the
Auxterminal on the SmartShunt. This ensures that the temperature data is fed into the SmartShunt for monitoring. - Connecting to the Vbatt+ Terminal: Next, take the ferrule pin of the red wire cable and push it into the
Vbatt+terminal on the SmartShunt. This establishes the necessary electrical connection for the temperature sensor. - Connecting to the Battery: Finally, connect the M10 cable lug of the temperature sensor to the positive terminal of your battery. This completes the circuit and enables temperature monitoring.
By following these steps, you can set up your Victron SmartShunt ($95.95) to monitor the temperature of your battery.
Temperature monitoring is crucial for understanding the health of your battery and can be invaluable for preventive maintenance.
GX Device Connection
For systems that include a GX device like the Victron Cerbo GX (Price not available), the SmartShunt battery monitor offers not only the capability to connect directly to the GX device, but also real time updates that can be seen on the Victron GX Touch 50 Display Screen (Price not available).
This provides an additional layer of monitoring and control, allowing you to read out all the monitored battery parameters through the GX interface.
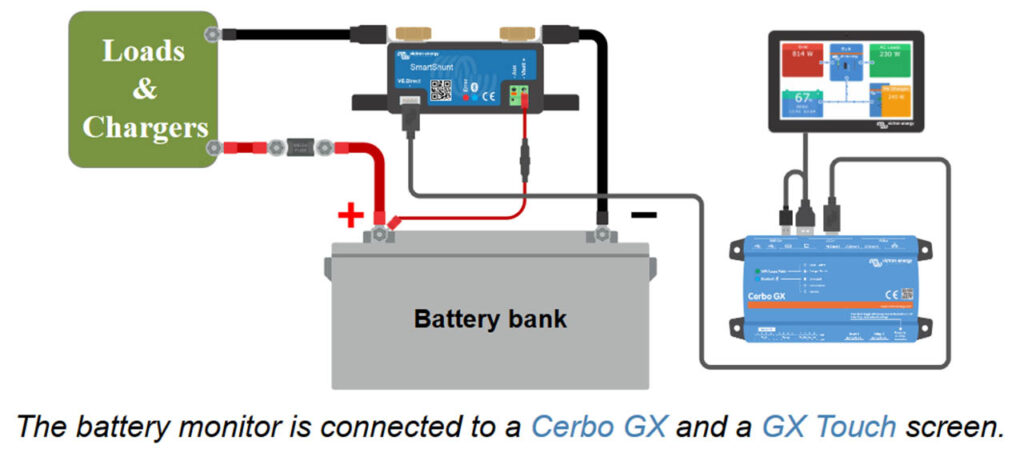
Here are the possible connection options:
- VE.Direct Cable ($13.60): One of the most straightforward ways to connect the SmartShunt to a GX device is by using a VE.Direct cable. This cable plugs directly into the VE.Direct terminal on the SmartShunt and the corresponding terminal on the GX device.
- VE.Direct to USB Interface ($28.05): Alternatively, you can use a VE.Direct to USB interface to establish the connection. This is particularly useful if the GX device you’re using has a USB port but lacks a VE.Direct terminal.
GX Device Functionality
Once connected, the GX device serves as a comprehensive monitoring platform. You can read out all the battery parameters that the Victron SmartShunt ($95.95) is monitoring, providing a centralized location for all your monitoring needs.
For those interested in a more detailed understanding of connecting to a GX device and utilizing the VRM portal, additional information can be found in the respective chapters.
By integrating the SmartShunt with a GX device, you can take advantage of advanced monitoring features, making it easier to manage and maintain your electrical system.
Wiring for Use as DC Meter
The SmartShunt is not limited to just monitoring batteries; it can also be configured to act as a DC meter for monitoring specific devices or circuits.
This versatility allows you to keep tabs on various aspects of your electrical system.
Configuration
Before using the SmartShunt as a DC meter, you’ll need to configure it for this specific function using the VictronConnect app.
Detailed instructions for this can be found in the “Configure for Use as DC Meter” chapter.
Dual Monitoring Setup
It’s possible to have a dual-monitoring setup where one Victron SmartShunt ($95.95) acts as the main battery monitor, and another is configured as a DC meter.
This allows for comprehensive monitoring of both the main battery bank and specific DC devices or circuits.
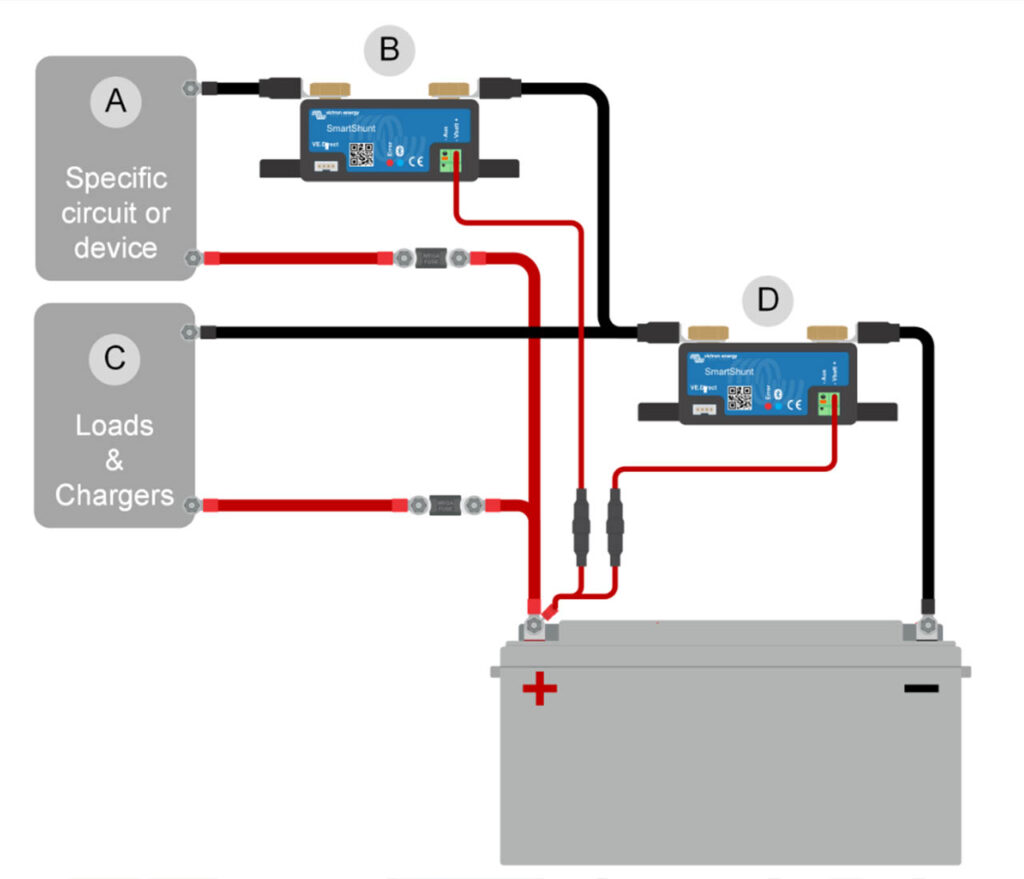
Wiring Example
In a system with dual monitoring, you would have:
- A: Specific DC Device or DC Circuit: This is the device or circuit that you want to monitor using the SmartShunt configured as a DC meter.
- B: Battery Monitor Used as DC Meter: This SmartShunt is wired to the specific DC device or circuit (A) and is configured to act as a DC meter.
- C: The Rest of the DC Circuit: This includes all other devices and components that are part of the DC circuit but are not being specifically monitored by the DC meter.
- D: Battery Monitor Used as Battery Monitor: This is the main SmartShunt that is monitoring the overall battery bank.
By setting up your SmartShunt in this manner, you can achieve a high level of granularity in your monitoring, allowing for better control and maintenance of your electrical system.